Friday, March 18, 2011

Family Room

Procrastinators.
That's the name for us. We've been putting off this room for an entire year.
But.... we've finally realized that in order to turn this office I'm sitting in into a nursery, we really have to make the family room liveable. Plus I'm just plain sick of owning a huge house and only utilizing half of it!
Stay tuned for some exciting progress.
There's going to be a whole lot more of this going on in the following weeks!

If you haven't been paying attention, this room used to have electric blue carpet. We're just now getting around to scraping up the old carpet padding. Then we need to do some patching of the concrete and reseal it because last summer we noticed some ants coming up through the carpet! After all that, paint and new carpet!!!

Photobucket

Monday, March 14, 2011

DIY Nursery

I suppose it's been long enough since I blogged. Since then we've found out we're having identical twin baby girls. In previous posts you have probably read I wanted to do a fun nautical/sea theme in the nursery. This hasn't changed, but it's moved more towards pretty starfish and mermaids and a bit further away from nautical. We have a very small budget, so I've been having a lot of fun crafting all kinds of things myself.
We'll start at the beginning. Here's a picture of the room when we moved in. We painted it Krypton by Sherwin Williams. And I installed those neat clip art rails which I stole from here.

We have since found a great oar at the antique store to use as a curtain rod. Please excuse the messy garage. It wasn't quite long enough so we cut it in half and added a dowel in the middle to lengthen it. Unfortunately trying to match the paint/distressing isn't working for me. Especially since my husband won't let me do it myself while I'm preggo. So I'm kind of stuck right now on this project.

I started sewing the baby quilts this week. Here you can get an idea of my color range.

We also chose baby names and I decoupaged the letters for above their cribs.

We bought a new printer and in the packaging were these super sturdy hollow cardboard tubes. I am ultra thrifty (cheap) and decided how cool would a mobile be made out of them? I had my hubby drill holes and I strung them up with fishing line. Then I collected some shells, starfish and sand dollars at the beach and hot glued it all up.

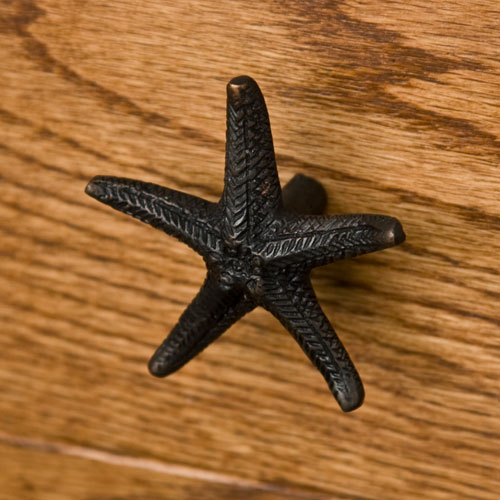
We got this great dresser off of craigslist and I love it. The problem is it's missing a knob. I took another knob off to go try and find a matching one, but that wasn't happening. Today I got the idea to maybe try starfish pulls instead? But I can't decide.

I love the shape of these knobs. But I'm really not a gold person so I'm not sure how comfortable I am with this idea.


Found here.

I really love the antiquey feel of this one.. but I'm not sure it matches anything else in my house at all.

Found here.

These two are on the top of my list but are a bit spendy. I usually love silver, but I'm afraid they won't stand out very much.

I really love it in oil rubbed bronze though. Again, too expensive!!!

Found here.

Or I could go this route...

Found here.

I'm obviously very undecided!!!

Lastly I really really want to find or make some of these.
I originally saw them over at The Lettered Cottage.
But they are sold by White Flower Farmhouse. And are incredibly out of my price range. Guess I'll just have to get thrifty again!!!

Gorgeous!!!!!

I've also commissioned some art from a lovely friend of mine Tara who is a kick ass mom, photographer and artist. You can check out her etsy page here. Her facebook page here.

I can't wait to see the nursery all put together. Unfortunately at the moment it's a huge heap of extra stuff I can't figure out what to do with and our computer Ar moire is taking up a huge portion of it.

Saturday, January 22, 2011

Bird Cage

We were driving home from The Home Depot when my husband saw signs on the side of the road reading " Vancouver Flea Market "
He of course swerved across 2 lanes of traffic to make it, and this was my $15 Flea Market Find. It's over 4 feet tall!
I'm in love.

Photobucket

Monday, January 17, 2011

Bathroom Door

Let's start with the door today. This is the back of the bathroom door.

This is how wide the gap between the walls and the door were. Kinda creepy huh? I've been living with this giant gap for several months, and although I know it's just my husband possibly leering at me, I'm sure my guests don't feel as comfortable.

It was time for action. So much better!!! We are planning on replacing the door so we didn't care much about the paint drips on it. It's hollow and broken in several places. But that's another project for another day.

We also installed some trim on the floors. This is the first room in the house it's been installed in and I am sooo excited!!!

And then very late last night my wonderful hubby finally hung my johnny cabinet. :)

I'm so very happy with how the bathroom has come along this weekend. We didn't finish everything we'd hoped to, the caulk on the tub is still half done and I haven't had a shower in 2 days so that needs fixed asap, the floor still needs a bead of caulk around the entire perimeter, and the corner of that little wall separating the toilet and shower needs to be primed, painted and capped off. Then we'll have an entire room... done! Our first room with trim around the door and floors!!! I think I'll probably be spending a lot more of my time in the bathroom from now on, just so I can remind myself that this is what we are capable of when the rest of the house seems so very overwhelming.
Photobucket

Sunday, January 16, 2011

Mid Way

We are currently at the mid way point of our final bathroom renovations. So I'll give you a quick check in to see our progress. Hopefully by the end of the day I'll have some killer after photos!

So, here was the before, you can see the beam to the left had raw drywall and a metal corner cap.

After, the drywall putty is nicely dried and sanded. Ready to be primed and painted. I also touched up the walls in the background. We had originally hung a towel bar over there and realized it was a ridiculous location, it's now on the back of the door where you can actually reach it from the shower!

And the missing wall by the toilet?

Voila! Oh it's so very nice after months of staring at that plumbing to have a nice wall.

Since we decided to keep that panel accessible for future plumbing issues, we used a very thin sheet of paneling and just tacked it on the very sides with nails. We'll be adding corner cap and the piece of quarter round you see in the back to cover up the nails and allow easy access.
Next? We have a johnny cabinet to hang over the toilet, because I'm sick of tripping over the excess toilet paper rolls, and there is door trim and floor trim that has already been cut and painted and is ready to hang today. It should be a rather quick job to finish it all up today. Mr Brick Ranch has been having a blast trying out his new nail guns on this project :)
Photobucket

Thursday, January 13, 2011

Our dirty little secret.

We have this little secret we've been hiding. You see, after Mr Brick Ranch went back to work we neglected to finish the other side of the shower wall.

So when you sit down on the toilet.. This is what you see....

Pretty awful isn't it? But today we went out and purchased the last materials we needed to cover up our little hole in the wall. We decided we'd like to keep it accessible for plumbing emergencies, so we are making it one big removable panel. I popped on my painting overalls, realized that at 21 weeks pregnant with twins I looked ridiculous and couldn't button them closed. But I painted that panel, so stay tuned for some updated before and after pics. Including some trim around the door so nobody can leer at you in the bathroom any longer, and some new baseboards and caulk!

Purdy Aint I?

Photobucket

Monday, December 6, 2010

Happy Holidays!

It's beginning to feel a lot like Christmas around here! Okay so I know the picture isn't very clear but those stocking holders are silver and spell out PEACE. I saw them on somebody else's blog and thought.. Oooh I wish I had those. Then I thought, well there are only three of us so that'd be weird. THEN.. I realized next year there will be 5 of us! And it seemed to be fate when I was shopping in Target with my mom and there they were! She was very sweet and bought them for me. Yay!
My two year old has already undecorated the tree about 3 times. But nothing is breakable. All the bulbs are plastic from Dollar Tree. Except the ones on the very top which are keepsakes.

Photobucket